Administration
The Administration menu is where you complete setup, started before or during training. So although it is the last menu on Fund Manager, we will consider what is on it first.
There are a number of records set up here:
- Names
- Accounts
- Bank Accounts
- Ledger Codes
In addition this is where you have period end options:
- View Opening Balances
- Perform year end close-down
If you use Joinos, you will also see the following options on the Administration menu:
- Create Joinos Codes
- Manage Connections
Tip: Remember you can get more help on anything you read in this chapter by checking the help on the Fund Manager screens. For more information, see Getting help on the screens.
Manage Names
You can import pupil Names from your school administration database.
Note: Pebble Support generally does this for you as part of your initial setup.
Each Pupil has their own entry within Fund Manager so you can register individual transactions against them. More options are available such as Staff, Contact details and Groups. Other names, including organisations etc., can be added as required using the Manage Names/Organisation option.
You will need to refresh your pupil and staff information e.g. at the start of a new year or term or when pupils move from class to class or year to year. If you use MISapp or have an integration, pupils will automatically move from class to class, year to year once you refresh the data. New names for pupils or staff will appear ready for you to import into Fund Manager - don’t forget to archive old pupils and staff when they leave school via Administration > Manage Names > Batch Actions. If you are not using MISapp or a third party integration, you will need to update names manually, with an imported CSV file.
Note: It is your responsibility to handle personal data in accordance with GDPR law.
In Administration > Manage Names, use the Filter box at the top of the Manage Names screen to find quickly the Name/Group/Year/Class etc. you are looking for.
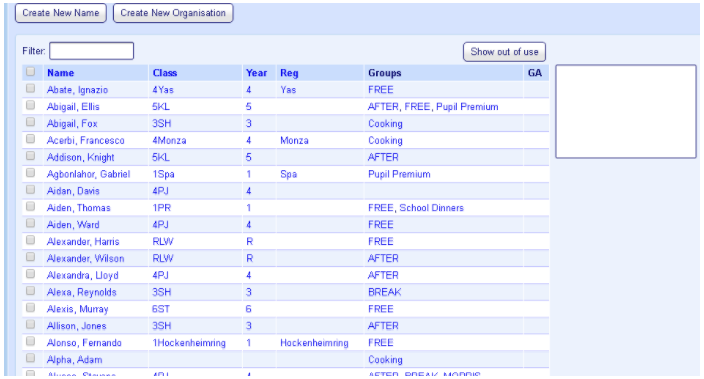
Batch Actions
The options in these sections can be applied to more than one name at a time.
Once a name is no longer required you can mark it Out of Use. Select the box next to the name and then select Out of Use.
You can return a name to ‘in use’ by clicking Show out of use. You will now see ‘out of use’ names; they will appear in grey. Select the name(s) and then select In Use in Batch Actions. Refresh the page by clicking Administration > Manage Names for the Name(s) to be returned to ‘In Use’.
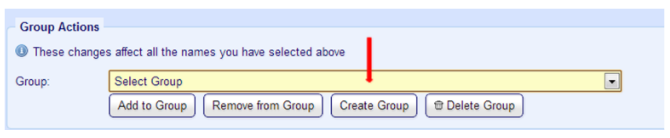
Group Actions
Pupils are already usually imported by Class, Year or Registration group or create your own pupil group (User Defined) for your Fund Manager names, e.g. trips, off site, overseas, sixth form, etc. You can also set up groups for different groups of pupils e.g. universal infant free school meals, pupil premium, etc. Together with the filter options throughout Fund Manager, groups assist you in selecting names quickly when you want to assign transactions to the names in the group or include the names in the group within reports, such as the Who’s Not Paid report.
Note: Names can be assigned to more than one group, so you can design the groups to make your workday easier.
Once you have created the groups you want to use, you assign names to the groups. This includes the names in the group and you can then apply various actions to the groups.
- Open Administration > Manage Names.
Create New Names/Organisations
We would always suggest that you Import your pupil names from your administration database; this should avoid duplication.
- In Use means that the record is on roll and actively in use.
- Gift Aid means that the parent or other adult is a tax payer.
Selecting this flag will mark the pupil for gift aid donation on the Names list and help you search on Gift Aid donors. However, in order to claim gift aid and complete the tax refund form for Registered Charities, you must fill in the gift aid donor details on the pupil details. Once you have created the pupil record, update the pupil details and select the Gift Aid tab for the pupil. There, enter the gift aid donor details (Title, First name, Last name, Address line and Postcode).
Note: You can copy in the gift aid donor information from the parent / guardian contact details you have on record. You may need to amend the copied details if they are incomplete.
Tip: If you update Gift Aid Donor details for a transaction that falls in a closed period it is automatically included in the next submission.
Note: Don’t forget to archive old pupils and staff when they leave school via Administration > Manage Names > Batch Actions.
New organisations can be created and only need creating once, using Create New Organisation. Input the organisation’s name, you do not have to enter any other details unless you want to. Once you have filled in all the information you require click Save.
Consolidating pupil names
If you have duplicate pupil names you can consolidate these into one and merge the associated contact details, transactions and taken items.
- On the Manage Names screen, click the pupil Name you want to use as the Primary Record. This opens the pupil Details screen.
- On the Details screen, select the Consolidate Pupil tab.
- Select the pupil in the list of names as the Secondary Record which you want to merge in with the Primary Record.
- Click Preview Consolidation.
- Check the details of the consolidation.
- If you are sure you are merging the correct records, click Confirm.
- Because you can’t retrieve the two separate records once you complete this process, you must click Consolidate Names at the prompt to confirm that this is really what you want to do.
These include Receipts, Payments, Transfers, Taken Items, Phone Numbers, Addresses, Email Addresses, Joinos Codes and sQuid Cards depending on what information is associated to each contact.
After clicking Consolidate Names, receipts, payments, transfers and taken items transferred from the Secondary Records will now be reported as belonging to the consolidated Primary Record and the Secondary Record will be marked Out of Use.
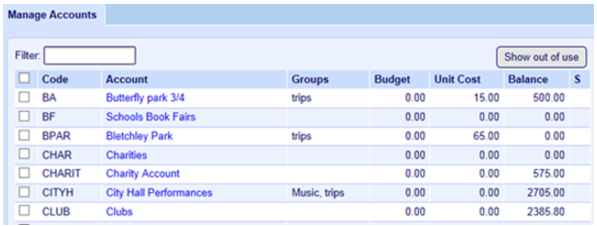
Manage Accounts
An Account (sometimes known as a cost centre) is equivalent to an individual column header in a manual ledger. Accounts can be created at any time. There is no effective limit to the number of Accounts you may have, but each one must have its own unique Code.
The Account Code is a combination of between 1 and 6 letters and/or numbers. Once saved, a code and an account name can be edited but can never be deleted; instead Accounts are taken Out of Use when you have no further need of them. This prevents them from appearing on the transaction screens. They may continue to appear on the report screens if they have a balance which is relevant to the open financial period. The accounts in the group will be reported individually and with a subtotal.
Note: When accounts are listed in Fund Manager, they are presented in Account Code order; numbers first and then alphabetically.
To view and edit accounts
- Open Dashboard (Organisation Summary) > Manage Accounts
- By clicking on any of the Account names you can then edit the account details.
OR
Open Administration> Manage Accounts.
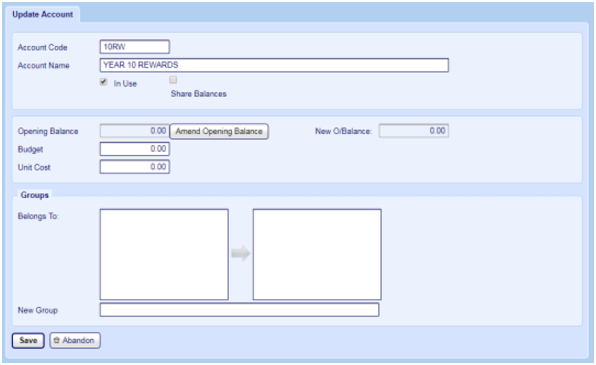
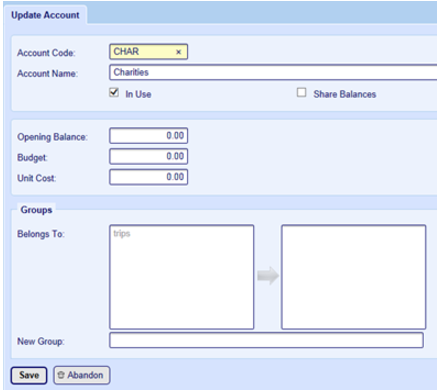
To edit account details
- The unique Account Code.
- Enter the Account Name.
- In Use is selected by default and this means that you can select the account on the system.
- Joinos for Parents only: If you want to share the balance through Joinos so parents can see what’s left to pay on an offer, select Share Balances.
- Register only: If you want to register pupil attendance and take-up of meals, using the Register tab within Fund Manager, then select Register Account.
- Select an Exclusion Group for the account.
- If you have an Android Tablet you have purchased direct from Pebble, and you want to view and record attendance on this, select Display on Device.
- If required, you can amend the account Opening Balance (the amount of money the account owned or owed on the date the account was created) although we do not recommend this.
- Select Increase or Decrease.
- Enter the value by which you want to increase or decrease the opening balance. For example, to increase by £10, enter 10.00 in the balance by box; to decrease by £25.30, enter 25.30 in the balance by box.
- Click Set Opening Balance Change.
- If you want to use the report, Who’s not paid, enter a Unit Cost (cost per pupil head).
- If required, select which Groups the account Belongs to by clicking the group name in the left-hand window. Or if you need to create a new group, enter the name in the New Group field.
- Click Save.
Note: You will need to create the offer as usual within Joinos, using Joinos > Create Offer, then select the Unspecified check box and enter the minimum amount you would like parents to pay, complete the offer with the relevant attachments, add names to the offer and then post to make it visible to parents. Once a parent has paid the deposit, they will be able to see what they have left to pay, via the Balances tab in Joinos.
Note: You must select an Exclusion Group even if you don’t have any pupils assigned to it.
Note: If you have any other Tablet, you must check with Pebble Support for its compatibility.
For example, if you have discovered that your user accounts and bank accounts don’t balance, and have identified the reason why you can increase or decrease the user account opening balance so that the user accounts and bank accounts balance correctly.
Note: Don’t use this option as a short-cut to entering a transaction on the system to get your accounts to balance. Entering a transaction - either anew if you had not entered it before, or as a contra-entry to cancel a mistaken entry - is the best way to get your accounts to balance as this provides traceability when you come to audit your accounts.
Warning! If you amend the user account opening balance so that your user accounts and bank accounts don’t balance you will not be able to complete your period end close-down.
If you need to amend the opening balance, click Amend Opening Balance.
To increase or decrease the opening balance:
A negative value indicates an expected level of expenditure or loss. A positive value indicates an expected level of income or profit. This might be useful for budget holders to know their budget position by simply looking in Fund Manager for the funds that remain available.
Note: If you don’t use a unit cost then the Who’s Not Paid report won’t generate any details for you to view.
Batch Actions
The options in these sections can be applied to more than one account at a time.
Once an account is no longer required for daily use you can mark it Out of Use. Select the box next to the Account then select Out of Use. If you need to report on an archived account simply click Show Out of Use.

You will now see archived Accounts – they will appear in grey. To mark an account in use again, select the box next to the Account then select In Use in the Batch Actions section, Click the Update Account(s) button for the Account.
Then click the Hide out of use button again to return.
Group Actions
You can create your own account groups for your Fund Manager accounts, e.g. trips, off site, overseas, sixth form, etc. Together with the filter options throughout Fund Manager, groups assist you in selecting accounts quickly within reports.
Note: Accounts can be assigned to more than one group, so you can design the groups to make your workday easier.
Once you have created the groups you want to use, you assign accounts to the groups. This includes the accounts in the group and you can then apply various actions to the groups.
- Open Administration > Manage Accounts.
To create a new account
To create a new account to pay receipts to and make payments from:
- Click Administration > Manage Accounts > Create New Account.
Manage Bank Accounts
A Bank Account can be any account held with a bank that is used for the purposes of managing your Fund, eg current account, Savings accounts etc. Many schools operate with a single Bank Account for their School Fund. The system comes with one such Account already defined. This is called 'Current Account' but you may edit this Bank Name if you wish. Click the Current Account Name and then overtype the Name 'Current Account' with whatever you want your Bank Account to be called.
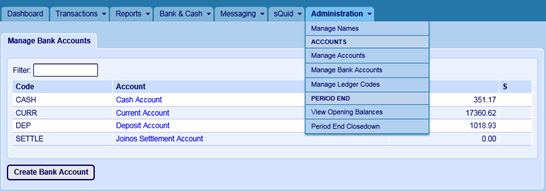
If you have more than one Bank Account you may create additional accounts by clicking Create Bank Account. You will need to add a unique Code and Name. However the name of the Default Account cannot be changed from code CURR (nor can it be archived). The Name normally includes the name of the bank itself and the type of account. This information can be edited when necessary.
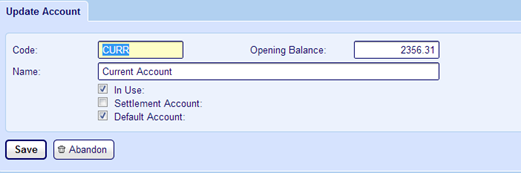
You can set an Opening Balance for a Bank Account. This is the value of the Reconciled Bank Balance at the date on which you are creating the account.
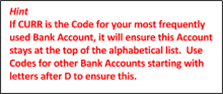
You can also mark an Account as your Default Account in this screen, i.e. the Account you use most frequently eg the CURR – Current Account.
Ledger Codes
The Ledger Codes option is available for providing exports into other finance packages to allow you to continue providing unified reports (eg VAT reporting), whilst gaining the benefits of Fund Manager's superior transaction entry. Set up your ledger codes in Fund Manager to match the Ledger codes in your external finance package. Then you can assign debit and credit entries to the correct ledgers to make accounting easier (e.g. grouping all trip transactions etc).
There are two types of Ledger Code:
This is used to group transactions for a particular purpose.
This is used to match the bank in Fund Manager to the bank code in an external financial system.
The codes can be Alphanumeric, up to 20 characters. If you integrate with an external accounting package for reporting purposes, set up the codes in Fund Manager that match the same codes in the external system you are integrating with. This ensures that the transaction appears in the external ledger that you want it to, making it easy for you to identify and track the transactions or if a bank ledger code that the transactions are posted to the expected banks in both systems.
To create a Ledger code
- Open Administration > Manage Ledger Codes.
- Click New Ledger Code.
- Enter the Code and the Name.
- Select In use if you want to be able to select the code for transactions.
- Click Save.
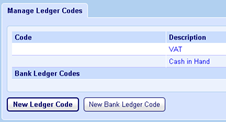
Note: The VAT and Cash in Hand ledger codes are set up in Fund Manager by default and you can’t amend the name of these codes.
Note: It doesn’t apply to the VAT or Cash in Hand codes.
To create a bank ledger code
- Open Administration > Manage Ledger Codes.
- Click New Bank Ledger Code.
- Enter the Code and select the Bank account.
- Click Save.
Note: You can only select a bank account that has already been created using Administration > Manage Bank Accounts.
Period End options
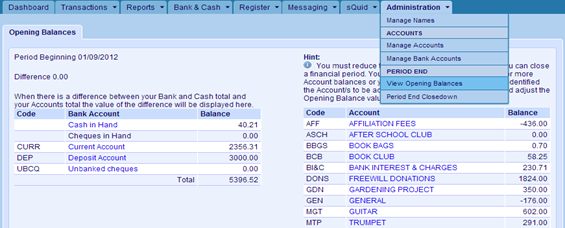
View Opening Balances
The Opening Balances of your accounts and bank accounts are usually entered by Pebble Support when you first begin using Fund Manager. If you create additional accounts or bank accounts, you can set up their opening balances using Administration > Manage Accounts and Administration > Manage Bank Accounts.
You can see all of your accounts and their balances using Administration > View Opening Balances. Bank Account opening balances are shown in the left column while Account opening balances are shown in the right column. The totals of the two columns should always match. The Difference should always be 0.00.
These will also be the Opening Balances for the new financial year following a Period End Close-down. Once the end date for your financial period has passed you can perform a Period End Closedown in Fund Manager that will draw a line under your transactions and allow you to produce the necessary reports to submit to your auditor once you have reconciled all your bank accounts. During the Period End Closedown, Fund Manager will automatically carry forward your account closing balances and present them as the opening balances in the next period.
Period End Closedown
Note: You do not have to stop entering transactions in your new financial year. You can close down any time after your year end date.
You will need to close down Fund Manager after period end. When you confirm all transactions for the period, these become locked and Fund Manager will automatically carry forward your account closing balances and present them as the opening balance in the next period.
Closedown is something that many people find difficult. Because of this we have created a guide to take you through this step-by-step. For more information, see Period End Closedown Your Financial Year End Guide
Joinos options
Joinos is Pebble’s platform for helping you and the parents of your pupils communicate, pay for trips, school activities and meals.
Although there are two options in the Administration menu, both of these options open the four tabs which enable you to manage the creation and issue of Joinos codes and letters and the contacts for pupils. These tabs are:
- Create Joinos Codes.
- Joinos Codes.
- Manage Connections.
- Joinos Letters.
There are also Joinos options on the Joinos menu. For more information, see the section on Joinos in SIMs Software Integrations.
Create Joinos Codes
You use this screen to select students and staff who are waiting to be registered on Joinos and create Joinos codes for them.
Joinos codes are used by parents to access Joinos and pay for trips and activitites for their child.
- Open Administration > Create Joinos Codes.
- Select the pupils to generate Joinos codes for.
- Click Create Joinos Codes.
The codes are displaed on the Joinos Codes tab.
Note: Joinos codes expire if they aren’t used within three months by the parents/carers to register the child on Joinos. In that case you will need to issue a new Joinos code. To do this, use the procedure above, but before selecting pupils to recreate codes for, click Show Registered.